
Kitchen splashback tiling Liverpool homeowners ask us about usually starts with one of two jobs: a new kitchen that needs finishing properly, or a tired kitchen where the old tiles are cracked, stained or simply dated. Either way, the splashback is the part of the kitchen you look at every day, and it is also the part that takes the most punishment from steam, grease and splashes. This guide explains what kitchen splashback tiling costs in 2026, which tiles work best, how a neat and level splashback is actually fitted, and the mistakes that make a new kitchen look unfinished.
What a Tiled Kitchen Splashback Is For
A splashback protects the wall between your worktop and wall units from water, cooking fat and heat. Painted plaster behind a hob or sink soon shows marks that will not wipe off, and moisture behind a sink can work its way into the plaster and lift the paint. A tiled surface with sound grout lines can be wiped clean in seconds and will look the same in ten years as it does on the day it is finished.
It is also a design decision. The splashback ties the colour of the units, the worktop and the walls together, so the right tile and layout can make a budget kitchen look considered, while the wrong one can make an expensive kitchen look busy.
A Recent Kitchen Splashback Tiling Job in Progress
The photos in this article are from a recent Kew Construction kitchen: sage green shaker-style units, a navy chimney hood, a white worktop and a gas hob. The client chose classic white rectangular metro tiles laid in a brick bond, which keeps the room bright and lets the colour of the units do the talking.
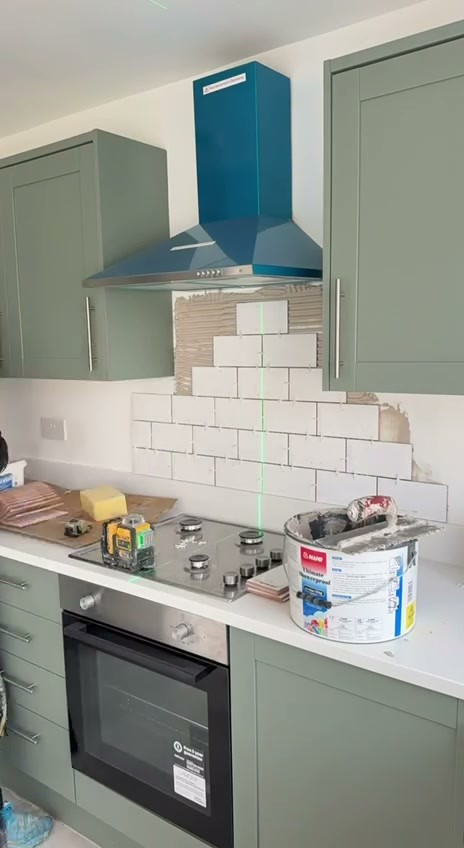
You can see the green laser line in the photos. Before a single tile goes on, we set out the layout from a laser rather than from the worktop, because worktops are rarely perfectly level. The tiles are then worked up from the bottom course and across from the centre line of the hob, so the cut tiles at each end are the same size and the pattern looks deliberate.
Kitchen Splashback Tiling Liverpool Costs in 2026
Every kitchen is different, but these figures are a realistic guide to what most homeowners in Liverpool and Merseyside pay in 2026. They include labour, adhesive, grout, trims and silicone, and are confirmed in a fixed quote after a free survey.
- Small upstand or single-row strip: around £200 to £400 in labour, usually finished in half a day to a day.
- Full splashback between worktop and wall units (average kitchen, roughly 3 to 5 m²): around £350 to £700 in labour, usually one to two days.
- Removing old tiles and making good the plaster: typically an extra £100 to £300, depending on how well the old tiles come away.
- Feature layouts such as herringbone or chevron: allow 30 to 50 percent more labour, because of the extra cutting and setting out.
Tiles themselves vary widely. Glazed ceramic metro tiles cost roughly £15 to £35 per square metre, porcelain £25 to £60, glass mosaic £40 to £100, and handmade or zellige-style tiles £80 to £200 or more. Adhesive, grout, spacers and trims usually add £40 to £100. Put together, most tiled splashbacks we fit come to roughly £500 to £1,200 in total.
For comparison, a made-to-measure toughened glass splashback behind the hob alone is often £150 to £400, and a full run of glass panels measured and fitted by a specialist is commonly £600 to £1,500 or more. Tiles remain the most cost-effective way to protect the whole wall.
Choosing Tiles for Your Kitchen Splashback
Ceramic metro tiles
Metro tiles are popular for good reason. A glazed ceramic surface is hard-wearing, easy to clean and does not stain, and the bevelled or flat rectangular shape suits both shaker and handleless kitchens. White metro tiles keep a small kitchen feeling bright. Laid in a brick bond, they look classic; laid in a vertical stack, they look more modern.
Porcelain tiles
Porcelain is denser and tougher than ceramic and comes in stone, marble and concrete effects. Larger porcelain tiles mean fewer grout lines, which many people find easier to keep clean. Our guide to large format tiles explains the pros and cons of big tiles in smaller rooms, and the same rules apply in a kitchen.
Glass mosaic and feature tiles
Glass mosaics add colour and shine and work well as a feature strip or behind the hob. Handmade and zellige-style tiles have uneven edges and a slightly irregular glaze, which gives a lovely finish but costs more to buy and takes longer to lay.
Patterns and layouts
The same tile can look completely different depending on the layout. Brick bond, vertical stack, horizontal stack and herringbone are the most common choices. Herringbone looks stunning but needs careful setting out and more cutting; our herringbone tiling guide explains the extra cost and time involved.
How We Fit a Kitchen Splashback, Step by Step
1. Checking and preparing the wall
Tiles are only as good as the wall behind them. We check that the plaster is sound, dry and reasonably flat. Fresh plaster must be fully dry before it is tiled, and gypsum plaster is primed so the adhesive bonds properly. If old tiles are being removed, any damaged plaster is made good first. Our article on tile backer board versus plasterboard explains why the surface behind tiles matters so much.
2. Planning sockets, switches and the hob
Sockets and spur switches on a splashback need to sit neatly in the tiled finish. If sockets need moving or adding, that is planned before tiling starts and carried out by a qualified electrician, in line with the electrical safety rules in Approved Document P. We also check the hob manufacturer’s clearance distances for the cooker hood and wall.
3. Setting out from a laser line
We set out the layout from a laser level and the centre line of the hob or window, not from the worktop. This avoids thin slivers of tile at the ends and keeps every course straight even if the worktop or ceiling is slightly out of level.
4. Fixing the tiles
The adhesive is chosen for the tile and the location. Light ceramic tiles in a dry area can use a good-quality ready-mixed adhesive, while heavier porcelain and tiles close to a hob are usually fixed with a flexible cement-based adhesive. The adhesive is combed with a notched trowel and the tiles are pressed and levelled, with spacers keeping the joints even.
5. Leaving a movement gap at the worktop
The bottom row of tiles is kept a few millimetres above the worktop. That gap is later filled with a flexible kitchen silicone rather than grout, so slight movement in the worktop or units does not crack the joint.
6. Grouting, sealing and finishing edges
Once the adhesive has set, usually the next day, the splashback is grouted. A stain-resistant or epoxy grout is worth considering behind the hob and sink. Exposed tile edges are finished with matching trims, and the worktop line and internal corners are sealed with silicone.
Tiling Behind a Gas Hob or Range Cooker
Ceramic and porcelain tiles are non-combustible, which makes them one of the safest and most common finishes behind a gas hob. The key points are to follow the hob manufacturer’s minimum clearances, to use an adhesive and grout suited to the heat, and to avoid plastic, acrylic or other combustible panels directly behind a gas flame. If you prefer glass, it must be toughened glass made for the purpose. Range cookers often have their own guidance on wall finishes, so we always check the installation manual before work starts.
Kitchen Splashback Tiling Liverpool Mistakes to Avoid
- Tiling straight off the worktop. Worktops are rarely perfectly level, so courses drift and the top row ends up uneven under the wall units.
- Grouting the worktop joint. A rigid grout line at the worktop will crack; it should be a flexible silicone joint.
- Leaving thin slivers at the ends. Setting out from the centre gives equal cuts at both ends and a balanced look.
- Forgetting the sockets. Sockets that are too low, crooked or not set to the tile depth spoil an otherwise good job.
- Skipping the primer on new plaster. Without it, tiles can debond over time.
- Using white grout behind the hob. It stains quickly; a light grey or stain-resistant grout stays looking clean.
- Not ordering enough tiles. Allow around ten percent extra for cuts and breakages, and keep a few spares for future repairs.
- Tiling over loose old tiles. Any hollow or loose tiles underneath will eventually let the new splashback down.
- Choosing a pattern that fights the kitchen. A busy tile with busy worktops can overwhelm a small room.
How Long Does Kitchen Splashback Tiling Take?
A typical splashback in a Liverpool kitchen is tiled in one day and grouted and sealed the following day, because the adhesive needs time to set before grouting. Small upstands can be finished in half a day. Allow two to three days for large areas, feature layouts, or jobs where old tiles need to be removed and the plaster repaired first. Your kitchen stays usable for most of the job, although we ask you to avoid cooking on the hob while the adhesive and grout behind it are curing.
Kitchen Splashback Tiling Liverpool Landlords Can Rely On
A large share of Liverpool homes are rented, and the kitchen splashback is one of the first things tenants and letting agents notice at a viewing or check-out. For landlords, the priorities are a little different from a homeowner choosing a feature tile. The finish needs to be durable, easy to clean between tenancies and quick to repair if a tile is ever damaged.
For rental kitchens we usually recommend plain white or light grey glazed ceramic tiles in a simple layout, a mid-grey stain-resistant grout, and a few spare tiles from the same batch left in the property for future repairs. This keeps the cost sensible, avoids the dated look of a bold pattern, and means one cracked tile can be replaced without retiling the whole wall. Where a property is between tenants, we plan the work so the kitchen is back in use as quickly as possible, which helps keep void periods short.
If you manage several properties, we are happy to quote for splashback tiling across a portfolio, and we can work with your letting agent to arrange access.
Looking After a Tiled Splashback
A well-fitted splashback needs very little care. Wipe it down with warm soapy water or a mild kitchen cleaner, and avoid harsh abrasive pads, which can dull the glaze over time. Grease behind the hob comes off more easily if it is wiped while still fresh. Check the silicone along the worktop once a year; if it has started to discolour or come away, it can be cut out and replaced in less than an hour, which keeps water from getting behind the units. If a tile is ever chipped, a spare from the original batch makes a near-invisible repair.
Tiling as Part of a New Kitchen or Renovation
Splashback tiling is often the last trade in a new kitchen, after the units, worktops and appliances are in. Having the same person handle the fitting and the finishing avoids gaps between trades and the delays that come with them. Kew Construction also handles flooring and wider renovation work, so if you are updating the kitchen floor at the same time, our guide to levelling uneven floors before new flooring is worth a read. For tiling elsewhere in the home, see our bathroom tiling price guide.
Your Kitchen Splashback Tiling Checklist
- Decide the height: a strip upstand, full height to the wall units, or full height behind the hob only.
- Choose the tile, the layout and the grout colour together, ideally with a sample against your units and worktop.
- Confirm socket and switch positions before tiling starts.
- Check the hob and cooker hood clearances in the manufacturer’s manuals.
- Order around ten percent extra tiles from the same batch.
- Plan for the kitchen hob to be out of use for a day while the work cures.
Why Choose Kew Construction for Kitchen Splashback Tiling in Liverpool
- Precise setting out. Every splashback is laid out from a laser line, so the courses are straight and the cuts are balanced.
- The right materials for the job. Adhesive, grout and silicone are chosen for the tile and its position, especially behind hobs and sinks.
- Clear, fixed quotes. You know the price before work starts, with no surprises left unmentioned.
- Tidy, respectful working. Worktops and floors are protected and the kitchen is left clean every day.
- Local and reviewed. Kew Construction is reviewed on Google, Checkatrade, MyBuilder and Trustpilot.
Book Your Kitchen Splashback Tiling in Liverpool
Kew Construction is a family-run bathroom, tiling and renovation business based in Liverpool, working across Merseyside, including Crosby, Formby, Maghull, Aintree, Bootle and the Wirral. Whether you have a brand new kitchen waiting for its splashback or an old one that needs a refresh, we can help you choose the tiles and fit them properly.
Call Ariel on 07453273876 or email Info@kewconstruction.com to arrange a free survey and quote. You can see more of our finished work on Instagram.
Frequently Asked Questions
How much does kitchen splashback tiling cost in Liverpool?
As a guide for 2026, labour for a small splashback strip is around £200 to £400, and a full splashback between the worktop and wall units in an average kitchen is around £350 to £700. With mid-range tiles, adhesive, grout and trims, most kitchens come to roughly £500 to £1,200 in total. The exact price is confirmed in a fixed quote after a free survey.
How long does it take to tile a kitchen splashback?
Most kitchen splashbacks are tiled in one day and grouted and sealed the next. Small upstands can be finished in half a day, while large areas, patterned layouts such as herringbone, or jobs that need old tiles removing first can take two to three days.
Can you tile behind a gas hob?
Yes. Ceramic and porcelain tiles are non-combustible and are one of the most common finishes behind a gas hob. The hob manufacturer’s clearance distances must still be followed, and the adhesive and grout should be suitable for the heat. Plastic or acrylic panels should not be used directly behind a gas hob.
Should splashback tiles sit directly on the worktop?
No. A small gap of a few millimetres is left between the bottom row of tiles and the worktop, then sealed with a flexible kitchen silicone. This allows for slight movement and keeps water out, whereas a rigid grout line at the worktop tends to crack.
Can you tile over old kitchen tiles?
Sometimes, if the old tiles are firmly fixed, flat and clean, and the extra thickness will not cause problems at sockets and wall unit edges. In most kitchens we recommend removing old tiles so the new splashback sits flat and lines up neatly.
What are the best tiles for a kitchen splashback?
Glazed ceramic metro tiles are hard-wearing, easy to clean and affordable, which is why they remain popular. Porcelain suits a modern look and large formats, glass mosaic adds colour, and handmade or zellige-style tiles give a more characterful finish at a higher price.
Which areas does Kew Construction cover?
Kew Construction is based in Liverpool and works across Merseyside, including Crosby, Formby, Maghull, Aintree, Bootle and the Wirral.